

Shepherds Craft Project
Make a shepherd scene
WHAT YOU NEED
Paper Towel tubes (cut in half)
White card stock (Beige card stock optional)
Scraps of material
String or twine
Yarn for hair and beard (yellow, brown, black, dark red, or white)
Brown Chenille pipe cleaners
Rubber bands
10 MM Craft eyes
Toilet paper tubes (cut in thirds)
Cotton or Cotton Balls
White Chenille pipe cleaners
Print the shepherd pattern sheet on white or tan cardstock - pdf file
Print the sheep pattern sheet on white cardstock
plus
Scissors or craft knife
Scotch tape
Glue
Crayons and/or markers
Ruler
STEP-BY-STEP INSTRUCTIONS
|
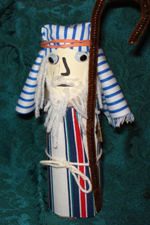
| SHEPHERDS Cut a paper towel tube into two equal lengths. This will make two shepherds. For each shepherd: 1. Cut out the "hand pattern" from the shepherd pattern sheet. Use it to mark and cut (along red line) a small tab in the tube. Bend the tab out. This will be the shepherd's hand. 2. Cut the robe out of fabric using the "robe pattern." Carefully cut the hand slit and slide the robe over the hand tab. Adjust the robe so that the bottom of the robe is even with the bottom of the tube. Use a few dabs of glue to hold it in place. Use a 13" length of string or twine to make the tie belt. 3. Cut out the face. Glue the eyes into place (or use a marker or crayons to color them). 4. Cut 15-20 small pieces of yarn (about 1" in length). Apply a small line of glue to the bottom of the face and between the nose and mouth. Press the pieces of yarn in place to form the beard and moustache. 5. Use tape to attach the face to the tube. Put the tape on the top of the face, leaving half of the tape unattached so that it can be folded over the top of the tube. Apply small dabs of glue onto 3-4 places on the back of the face. Align the face with the hand slit and be sure the top of the face is at the top of the tube. Press into place. Fold the excess tape over the top of the tube and press it into place on the inside of the tube. 6. Cut about 2 dozen 3" lengths of yarn. This will be the hair on each side of the shepherd's face. Divide the yarn pieces in half and press each half onto a 1" piece of scotch tape. This will be the hair on each side of the shepherd's face. Position each piece of tape so that the hair covers one edge of the face and fold the top of the tape inside the tube and press down. Use additional pieces of tape to hold the hair in place. 7. Fold head dress cloth in half. Position "head dress pattern" as shown and cut the head dress. The rounded edge will make the bottom of the headdress. Place it over the top of the tube. Use a rubber band to hold the headdress in place. 8. Trim a pipe cleaner so that it is about 8" in length. Bend the top to make the crook of the shepherd's hook. Dab a small amount of glue onto the inside of the hand tab and press the shepherd's hook into place.
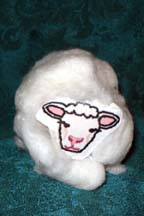
SHEEP Cut a toilet paper tube into thirds. Cut each piece in half (half tubes). This will make six sheep. For each sheep: 1. Cut a white chenille pipe cleaner. Each sheep requires two 2" lengths for its legs and a 1" length for its tail. 2.Cut out a rectangular "sheep belly" from the sheep pattern sheet. It may be necessary to trim the edges of the belly or the half-tube so that the widths match. 3. Use a pencil to poke through each of the holes in the "sheep belly." Push one of the 2" pipe cleaner lengths from the outside to the inside of the "sheep belly" and out through the matching hole. Repeat the process for the second set of sheep legs. Make sure all the legs are of equal length. This piece is now like a little table, and you should make sure that the "table" sits evenly on your work surface before continuing. 4. Use scotch tape to attach each side the sheep's belly to each end of the half tube. Be sure the legs are pointed out from the belly. Use a piece of scotch tape on both the inside and outside of each side to make sure it is secure. 5. Cut the "sheep's behind" from the sheep pattern sheet. Use a pencil to poke a hole in the middle of the pattern and push about half of the 1" length of pipe cleaner through the hole to make the sheep's tail. Tape the behind so that it covers one end of the body. 6. Spread glue onto the bottom of the sheep. If you are using cotton balls, you will need to pull each ball so it has a flatter shape. Glue the cotton onto the bottom of the sheep. Poke the sheep's legs through the cotton to create an even coat. Before continuing, you may have to readjust the legs so that the sheep will sit squarely on its feet! 7. Apply glue to the sheep's behind and paste on cotton, being sure that the sheep's tail pokes through. 8. Cut out the sheep's face. Trim as needed. Position it carefully so that the face is straight when the sheep sits on its legs. Tape the bottom back of the face to the inside of the sheep's belly. Tape the front of the face to the top outside of the tube. 9. Spread glue and press cotton onto the rest of the sheep. Tuck the cotton around the sheep's head being careful not to cover it up!
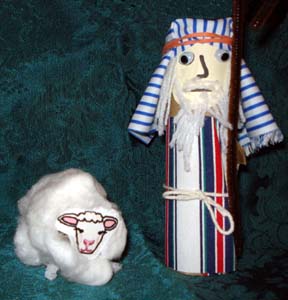
Arrange the shepherds and their sheep for a special Christmas scene.
|
| |
|
[Back] |
Click the icon above to download a free copy of Adobe Reader. |