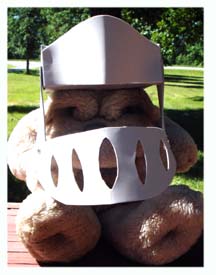
1. Have each student place a cereal box on top of his or her head, with the box top or bottom to the front. (Older children -with bigger heads - may want to use longer sides as the front and back.) Have another student center the box and, on the underside, draw a circle around the student's head. Cut out the circle. 
2. Use tape or glue to cover the box in grey paper. 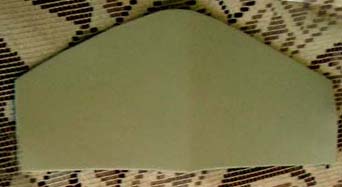
3. Print the Helmet Pattern on regular printer paper. Carefully cut out the pattern pieces. (If the long side of the box will be used as the front, make the helmet front piece and visor a little longer.)
4. Fold foam in half. Place pattern pieces on the foam. The visor and helmet front should be placed on the fold. (You may need to use a second piece of foam for the two side strips.) Trace the outline of the pattern pieces onto the foam. 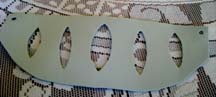 
5. Cut out the pattern pieces and use a hole punch for the holes on each end of the visor and front bottom of each side strip. 6. Center the helmet front piece on the front of the box. Use double-stick tape or glue to attach the helmet front to each edge. Be sure the straight end is on the bottom (head hole) of the box! 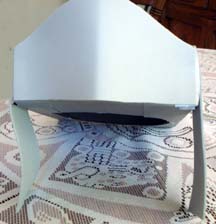
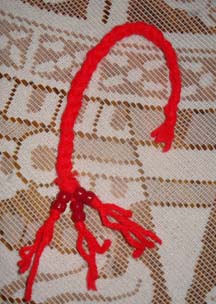
7. Glue each side strip to the sides of the box. (How high or low the strips are attached will depend on how long they need to be to reach the child's jawline.) The punch hole should be at the bottom front of the side strip. The front edge of the strip should be even with the front of the box. 8. Use a paper fastener to attach each end of the visor to the bottom of the side strips. Variation: After step 2, punch a small hole on the right and left sides of the head hole. Thread a piece of string or twine through the hole, making a knot on the inside end to keep it in place. Tie under chin to hold the finished helmet firmly in place. | 1. Group 2-4 pieces of yarn together and tie a knot about 3/4" from one end. Strong 2-4 beads onto the yarn. Make a total of 3.
2. Bring the 3 sets of yarn together and use a small rubber band to tie all of the yarn together at the unbeaded end.
3. Braid the yarn beginning at the unbeaded end. 4. Use a rubber band to tie off the braiding just above the beads. |